Thursday 24 January 2013

Room Transformation part 2 (and a paint calamity)

After a whole lot of agonising, we decided to paint B2s room a calming grey.


Typical man style, Mr Domestic didn't care for the finer details of what grey we would use, nor was he interested in getting some sample pots and testing out the different options. He bluntly told me "just pick a grey and I will go and get it, we are not mucking around with samples". I bit the bullet and picked a colour and crossed my fingers that it was going to work!


A very tired and unimpressed Mr Domestic


Here we are all ready to roll!


First coat went down and I was feeling pretty happy with how it was looking and then we ran out of paint...

Not really a big deal as we are only 10 mins from the hardware shop so a quick drive and Mr Domestic was back on the job with the second coat.


Hang on, there is something not quite right here, should the second coat look like a totally different colour to the first coat and the cutting in?


Mr Domestic assured me that it just needs to dry and it will lighten up to the right colour.


The next morning we have this


Well at least I know I am not crazy and seeing things!

Another trip to the hardware store to find out what on earth they have given us and half a day of painting  later we are back in business.

It turns out the person mixing the paint used the wrong brand of paint colourant to mix up our second batch. The moral of this story is to always double check they are mixing the exact same colour, take the original paint tin with you so you can be 100% sure. It will save you a whole lot of extra work!


Ahhh that's better


1950's art deco ceilings

These beautiful ceilings are why we fell in love with this house when we were looking to buy. If only we knew then what we know now how much work it took to finish off the rest of the house! (we would have still bought it haha)


Mr Domestics man style DIY curtaining, a white drop sheet will have to do until the Roman blinds are ready. Little B2 will be sharing his or her sanctuary with mummy's sewing things until our extension is up and habitable


Here we are looking back at the new wall which once opened up into the kitchen.

I am really loving the soft colour of the grey against the white window trims and ceiling I think B2 will love their new room too.

Obviously we have a fair bit left to do here until this is a finished room, but its starting to come together pretty nicely don't you think?


XO


Tuesday 22 January 2013

Little B's Big girl room

Little B doesn't know it yet but she is about to make a very charitable donation of her cot to the new baby. Seeing as she will have no bed we figure its only fair that we make sure we replace it with something nice for her.

After having a brief look around for bedroom settings and then Mr Domestic setting my budget at "spend as little as possible" I took this as a fun but time consuming challenge! After visiting her gorgeous cousins in the Hunter Valley and seeing cousin Rubes beautiful room, I have been totally in love with vintage style wrought iron beds.

With this in mind, I was inspired to create a fun eclectic room for little B that felt inviting and girly. I wanted the room to be able to grow with her so lots of good storage and easily update-able pieces were a must.


We found this darling bed in the local online classified and it was a done deal


vintage girls bed


vintage wrought iron girls bed


Next on the agenda was a dresser to keep her mountains of clothes, accessories and shoes nice and neat and I just couldn't go past this one at Ikea (on sale I might add!). With a few personalized touches I think it will be perfect.

Ikea dresser


My best "buy" yet is this sweet little trunk, my neighbors actually left out on the road side for collection. A few coats of white spray paint and some scrap fabric and quilt batting left over from a previous project and it is the perfect place to store some of her unused toys. You would never know its a roadside freebie!

updated toy trunk


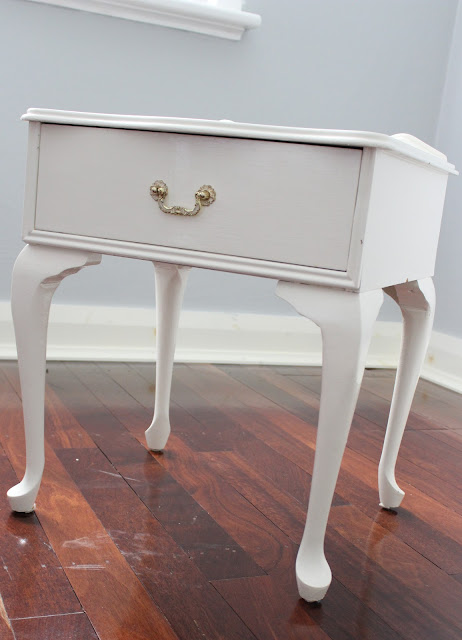
My last purchase is this little queen Anne bedside table. I'm not sure what it was about this particular style but I was like a woman on a mission looking through the classified ads until I found this exact one.

vintage bedside table
Don't mind my super clean floors in this picture!


I might be crazy but I think this needs to be another colour just to break up all the whiteness of everything...

All up including paint, fabric and a new mattress, this still worked out less than a cheap and rickety bedroom setting from a budget furniture store which has kept Mr Domestic happy and little B is over the moon with her big girl things.

Still have a bit to do before we can sign off on this one but we are almost there....

Xo


Sunday 20 January 2013

Getting busy with a room transformation part one

My countdown is on- the countdown until B2 makes his or her arrival and don't we have a lot to do! A few weeks ago we had a small scare with little B2 and weren't sure if they would be making an earlier than expected arrival, thankfully all good now but it's finally turned me into a (crazier) pregnant woman on a mission to get things done.

We have an amazing family friend who will be putting back up a wall to divide the kitchen and our dining room (currently used as my sewing room/ dining room/ junk room) with Mr Domestic as his trusty sidekick. This originally was I assume a bedroom and at some stage the previous owners decided to take out the wall to open up the space.

Unfortunately it didn't really work that way as it still feels awkward and well we really need an extra bedroom!

The only positives to the shoddyness of this original modification was that it really prompted us to get our act together and polish the floors. Before the boards were polished and this little bit was repaired there was a real possibility that you could fall through to the ground below. Just imagine where this secured cross beam was we had a rickety plank of wood that was kinda wedged in place. It was also a horrible little hidey hole for all sorts of gross out creepy crawlies to come out of mmm......


Just so you get a point of reference, this is what the room looks like right now from our kitchen....


Not very inspiring is it?

Please excuse the mess! I have noticed whenever anyone has a room that doesn't have a defined purpose it ends up as the junk dumping ground - thats my excuse anyway

Here is some progress.....


To support the new gyprock, we need to put in a frame you could do this out of wood but works just as well in steel. I haven't taken a picture but in addition to the outside frame, you need to add internal bracing. That keeps the gyprock nicely in place.


Gyprock up and plastered! All we need now is the skirting, a couple of coats of paint and we are in business!!


While the boys are busy doing all the easy stuff, I've been hard at work looking through paint schemes at Bunnings and trolling second hand stores and the Internet for bargains for Little B's room.


Now to decide on a colour for the new room!!


Make sure you check back for part two

xo


Bloody Mary Oyster shots


Mr Domestic is a big fan of oysters, so for something fun and a little different at our chistmas lunch, we decided to make bloody Mary oyster shots.


Oyster shots


Despite a few reservations about these from a few of our guests, they were a hit and we didn't have a single one left! This recipe has made into our keepers folder for sure, Mr domestic was a bit cheeky and made extra bloody Mary to have some ready to go for a "boxing day" pick me up.

To make 12 shooters -
500ml chilled tomato juice
160ml chilled vodka
2 tbs Worcestershire sauce
4-6 drops red Tabasco pepper sauce, or to your liking
Freshly ground black pepper and salt to taste
12 fresh oysters, removed from shells
12 x 8cm long strips of celery, for garnish

Combine tomato juice, vodka,Worcestershire, Tabasco sauce and season with salt and pepper in a jug and set aside. (You can make this well in advance if you like)

Divide oysters between 12 shooter glasses. Fill the glass with tomato mixture and garnish with a strip of celery strip.

Serve immediately and enjoy!


Just an FYI this is NOT the Bloody Mary mix that the bump and I are enjoying!

Cheers everyone xo


Related Posts Plugin for WordPress, Blogger...